How to Replace Front Lower Ball Joint 1997-2004 Chevy S10 Pickup Part 1
Created on: 2010-05-04
Watch this video to learn how to replace torn, loose, or broken ball joints. The experts at 1A Auto show you how to replace the lower ball joints on your 98-08 Chevy S10 or Blazer or GMC Sonoma or Jimmy.
-
step 1 :Loosening the Lug Nuts and Hub Nut
- Before lifting the car, loosen the lug nuts up with a 19 mm wrench, and the hub nut using a 35 mm socket. It's best to do this while the car is on the ground so the wheels won't move.
-
step 2 :Raising and Securing the Car
- Position the jack under the control arm with a jack stand under the frame.
- Raise the car (most of the weight should be on the jack stand).
-
step 3 :Removing the Brake Caliper
- Remove the tire, and the hub nut and washer.
- To remove the break caliper, there are two 18 mm bolts to remove-one on top and one on the lower backside.
- Once those are off, pry the caliper right off with the wrench.
- Remove the brake rotor.
-
step 4 :Redistributing the Weight
- Now, to redistribute the weight, move the jack out to the end of the control arm, and jack it up so that most of the weight in now on the jack with only a little weight on the jack stand.
-
step 5 :Removing the Harness
- First, disconnect the harness. Remove the clips on the left side of the harness, and use a screwdriver to pry it up off the frame.
- It would be best to coat the nuts with penetrating oil at this time.
- Take the small bolt off with the 10 mm wrench (put the bolt and the nut back into the control arm just for safe keeping so you'll know where they are).
- Remove the last bolt on the frame-a 13 mm bolt.
- Once the bolts are removed, pull the harness out and free. (Save the clips from the harness in case you need them to install)
-
step 6 :Removing the Hub
- There's three 18 mm bolts that hold the hub-one in the back, one in the middle of the top, and one in the front.
- The front and rear ones can be reached with an impact wrench or regular wrench. The middle one, you'll need to use a hand wrench. (Swivel the steering to help you get at the bolt easier.)
- Remove all three bolts.
- Using the pry bar or screwdriver, pry against the steering knuckle. (Be careful not to bend up that backing plate too much.)
- Pull out and away from the backing plate, and the hub is out.
- (There is a little O ring that needs to be replaced correctly. If you are replacing the hub, transfer it to the new hub. If not, make sure it's in the correct spot.)
-
step 7 :Removing the Jounce Bumper
- There are two bolts where the ball joint is secured to the control arm. (If your ball joint hasn't been replaced before, you'll just see little round rivets.)
- If it is rivets, use a cold chisel and pound them to shear them right off.
- Remove these bolts or rivets on the front, in the back and underneath.
-
step 8 :Removing the Ball Joint
- Remove the cotter pin and the bolt-22 mm or 24 mm-from the ball joint.
- Remove the cotter pin and the bolt-18 mm or 19 mm-from the tire rod end.
- For the tire rod end, hit it with a couple of good hammer hits. Holding the control arm, give the ball joint a few whacks as well.
- Take out all the bolts from the top of the ball joint.
- Pull down on the control arm and towards the rear of the vehicle, and the ball joint will come out.
Tools needed
-
14mm Wrench
Air Chisel
15mm Wrench
Socket Extensions
Torque Wrench
16mm Wrench
17mm Wrench
Rust Penetrant
Pry Bar
18mm Wrench
Jack Stands
19mm Wrench
10mm Wrench
Flat Blade Screwdriver
Floor Jack
11mm Wrench
12mm Wrench
13mm Wrench
Complete Metric Socket Set
This video is brought to you by 1AAuto.com your source for quality replacement parts and the best service on the internet.
Hi I'm Mike Green. I'm one of the owners of 1A Auto. I want to help you save time and money repairing and maintaining your vehicle. I'm going to use my 20 plus years experience restoring cars and trucks, to show you the correct way to install parts from 1A Auto.com. The right parts, installed correctly, are going to save you time and money. Thank you and enjoy the video.
In this video we'll be showing you how to remove a ball joint from this S-10 pickup, same as any pickup truck or Blazer. This is just the removal. We do have the installation in a video response to this video.
The tools you'll need are:
You'll need metric sockets anywhere from 10 mm to 35 mm with Handles and Extensions.
You'll need wrenches anywhere from 10 mm to 19 mm.
A jack and jack stands. You will also need a large screwdriver, or pry bar or air chisel. That's if you're replacing the original ball joints that are riveted in, penetrating oil and a torque wrench.
We strongly recommend that you have air tools. You can do it with hand tools, but it's slightly more difficult.
First, if you're using hand tools you're going to want to loosen those lug nuts up with a 19 mm wrench. You want to do this on the ground so that your wheels won't be moving. The other thing you're going to want to do is you're going to want to use your 35 mm socket to loosen the hub nut. Now I'm going to raise the car up and secure it.
I've raised the wheel I'm working on up off the ground by putting the jack under the control arm. I also have a jack stand under the frame here that's what's going to hold most of the weight.
I'm going to remove the tire, and then I can remove the center hub nut (35 mm) and the washer. Now, I'm going to remove my brake caliper by removing the bolt on top and the bolt on the backside. They're both 18 mm bolts. Now I'm going to use my wrench to just pry the caliper right off. Then, I'll take the disc off.
What you want to do is transfer the weight back on the control arms. Move the jack out to the end of the control arm, and jack it up. Now, most of the weight is on the jack with only a little weight on the jack stand. I'm disconnecting the harness, and then I'm going to remove the clips for the hub harness. These clips are on the left side. Use a screw driver to pry it up out of the frame. I'm prying the harness clips off. I'm going to coat the nuts with penetrating oil. Then I'm going to take the small one off with the 10 mm wrench.
I'm, actually going to get the wrench up behind to hold that bolt. Then, I'm removing that bolt. Okay, here I'm just finishing up taking out that bolt (I like to put the bolt and the nut back into the control arm just for safe keeping so I'll know where they are). The last bolt on the frame is a 13 mm bolt.
Now I'm just pulling the harness out and free. I'm going to pull the clips off the harness so that I can put them onto the new hub harness when I'm ready to install it.
Now you want to remove your hub. There's three bolts one in the back, one in the middle of the top, and one in the front. These are 18 mm bolts.
The front and rear ones you can get to with an impact wrench or regular wrench. The top one is a little more difficult you have to use a hand wrench. It helps if you swivel the steering which helps you get to the bolts much easier.
Then I'm taking them out. You can pry with a pry bar or a large screw driver. I'm using the screwdriver and pry against the steering knuckle.
You can see me get it apart now, just shaking it. You want to be careful not to bend up that backing plate too much. I leave that top bolt in it's very loose but it's still in there. Now the hub comes right out. Pull the harness out away from the backing plate and your hub is out.
There's this little O ring that you want to make sure goes back on correctly. If you put a new hub on, obviously, transfer it to the new hub, if you don't just make sure it's in the correct spot.
Now I'll remove this jounce bumper from the top to allow your upper control arm to fall down some more.
Where your ball joint is secured to the control arm, there are two bolts. This has been replaced before it's by bolts. If your ball joint hasn't been replaced before, you'll just see little round rivets. If it is rivets you've got use a cold chisel and just pound them to shear them right off. You're going to remove these bolts or rivets on the front, in the back and underneath everything is bolted underneath.
Then, with the ball joint shaft, I'm going to remove the cotter pin. I'm also going to remove this cotter pin and bolt from the tire rod end. This whole time, my jack here is supporting the control arm.
The best way to get at the inner bolts is to go under the shaft and hook on with your bolt. I'm just removing those four nuts right now. I am not removing the bolts from the top. I'm just taking the nuts off the bottom.
I'm also removing the cotter pin and the bolt from the ball joint. I believe it's either a 22 mm or 24 mm bolt. Okay, now here I'm removing the cotter pin and the bolt from the tire rod end. I believe that's an 18 mm or 19 mm bolt. For the tire rod end, you just hit it with a couple of good hammer hits. It comes right out. You do the same thing with the ball joint hold them down on top of the control arm and giving it a couple of whacks with the hammer.
Now, at this point, I'm taking out all the bolts from the top of the ball joint. After that, I pull down on the control arm and towards the rear of the vehicle, and the ball joint comes out.
Okay, that's how you remove your ball joint. We also have a video detailing the installation which can be found as a reply to this video. Check that out.
We hope this helps you out. Brought to you by www.1AAuto.com your source for quality replacement parts and the best service on the internet. Please feel free to call us toll free at 888-844-3393. We're the company that's here for you on the internet and in person.
Shop Products


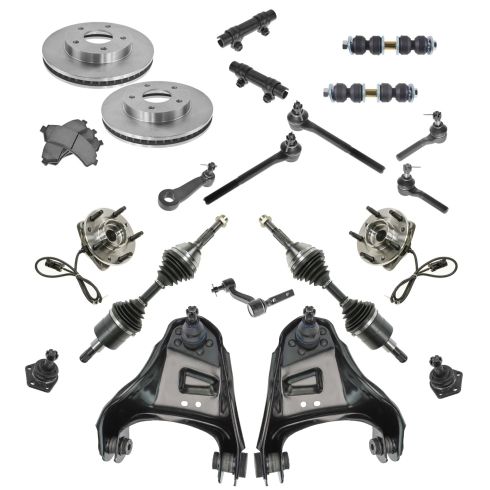
Chevrolet GMC Olds Isuzu Front Steering, Suspension, & Brake Kit TRQ PSA64826
- (2) Front Sway Bar Links
- (2) Front Lower Ball Joints
- (2) Front Outer Tie Rods
- (1) Idler Arm
- (1) Pitman Arm
- (2) Front Inner Tie Rods
- (2) Front Upper Control Arms with Ball Joints
- (2) Front Brake Rotors
- Ball Bearing
- Replacement Brake Kits Features & Benefits
- (1) Front Ceramic Brake Pad Set with Contact Point Grease & Hardware
- (2) Front CV Axle Assemblies
- (2) Front Tie Rod Adjusting Sleeves
- (2) Front Wheel Bearing & Hub Assemblies

How to Replace Front Lower Ball Joint 2005-16 Toyota Rav4
How to replace a rusty, worn, or broken front lower ball joint on your 05-16 Toyota Rav4.

