1964 Impala Convertible Project Part 5

We left off part four of the Chevy Impala project with me parking the car in the yard, and taking a year or two off.  Sad I know…  However, during that little break, I cleared my mind, and finally built myself a garage to work in.  On March 15th (read: cold, snow on the ground), I started building the garage from my own plans with a borrowed nail gun.  7 months later, I gathered some friends, and pushed my Impala into its new home.  By that time, it was beginning to get colder, and even though I was indoors, the non-insulated garage was too chilly to work inside.  5 more months pass, and spring 2011 has finally arrived.

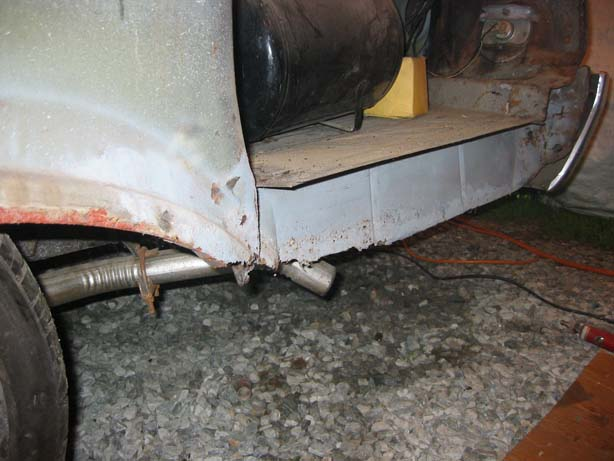
We left off with the quarter panel being fitted, but it didn’t really sit on there quite right. It was also intended for a hardtop, so I had to slice the top of it off.  This update is how I went about fitting the convertible metal to the hardtop quarter.  I began with a hole where some old metal belonged.

Read More

1964 Impala Convertible Project Part 4

We left off the last episode with a freshly fabricated trunk floor, and I had a new tail pan and taillight surround on order.   A few days later, they arrived, and work commenced.  If you are curious, I would imagine that at this point in the story, I must have had about 75 hours into the removal of the quarter, and the repair of the wheel house, filler neck surround, trunk drop off, and trunk floor.  It is easy to see why car restorations add up fast.   The labor factor is huge.  Moving on…

I began this round with the test fitting of the tail pan and the left taillight surround.  They were both perfect, except my trunk floor wasn’t.  Everything needed some TLC with hammers to align it all.  Once I was happy with the tail pan, I drilled a million holes in it and spot welded it all the way down just like when the car was new.  I then coated it in ugly reddish primer because that is what was within reach.

The taillight surround was much more challenging to align than the tail pan was. I used a variety of clamps, and cleco’s.  If you have never used cleco’s you are missing out.  They are cheap little devices that hold metal together like a champ.  Every tool box should have some.

Read More

1964 Impala Convertible Project Part 3

Last week we discussed the scariness of discovering acres of rot behind the quarter panel that I had just reluctantly removed.  Then I showed off the metal repair / replacement of the 64 Chevy’s outer wheel house, and trunk drop off.  There was one other piece that had some serious metal repair, but I already made a 1A Blog post about it over a year ago, so I won’t repeat it here again.  if you are curious, you can view the fuel filler neck surround metal repair Here.

Next on the Impala list was fixing all of the metal surrounding the “tailpan”.  Basically, the rear-most section of the trunk floor was rotted badly on both sides, and it all needed to go in the trash barrel. The bad news is that nobody makes these replacement panels, so I had to make them myself.  First step, cut out the rotted area and see what we’re working with. Eeeek!

As you can see , there was no shortage of rot on the driver’s side rear of the “six-foe”.  Rather than crying, I began making a flat metal replacement that was the “same” shape as the original.  The problem was that I didn’t have a lot of the old metal to work with, so most of this process was a guessing game. Read More

1964 Impala Convertible Project Part 2

We left off Part 1 of the 1964 Chevy Impala project with a freshly cut off quarter panel, and a fear of what I had just done.  There was no turning back though, the sheet metal was off, and crying was no longer allowed.  What I found hiding behind the quarter could have been described as something in between discouraging and disappointment. It was ugly at best.


As much as I would have loved to slap the new quarter panel on and forget that I had seen any of that, it would have haunted me for the rest of my life. I had no choice but to make like Dave Coulier and cut-it-out with my cut off wheel. The gas tank filler pipe surround  piece was in rough shape as well, which is what I believe to be the major contributor of the rot to this entire area. Read More

Restarting the 1964 Impala Convertible Project Part 1

I can’t speak for everybody, but I know that I love build threads.  When I read about what other people are working on, breaking, and racing, I get all amp’ed up and ready to weld the nearest object to me.  Watching a vehicle go from a total rust bucket to a weekend driver or show car is inspiring and often gives me the motivation I need to work on my own junky projects.  Just last weekend I read 192 pages of a build thread on The Samba about a 1938 VW beetle found in Lithuania. It literally took me a few hours to read, and it was quite possibly the most impressive forum thread I have ever witnessed.  When I was done reading it, I wanted to give somebody, anybody a round of applause.  My cat Malibu pranced into the room and was excitedly cheered on by me.  She assumed that she had won a major award, but really I was just in awe over the fantastic fabrication skills on the ’38 Beetle.  Bottom line is, when it comes to nice metal, I’m excitable. Read More

How To Properly Build A Mitsubishi Powered Honda S2000

The guys over at Infamous Performance in Fall River MA are a ridiculously talented group.  One of their latest creations is a 4G63 turbo powered Honda S2000.  It is owned by a guy named TJ (one of the Infamous guys), and it entered his life in an extra crispy form, complete with a freshly doused engine fire.  After owning a high horsepower DSM, the goal for this car was “not trying to be that fast, just trying to have some fun and keep the car in one piece“.  Sure.  Once in the shop, the “budget build” began.

Read More

RX7 Under Construction Pic.

Not much going on here.  Just a friend’s single turbo swapped 93 RX7 in the process of getting a new pilot bearing.  It should be back on the road soon enough though. Oh, and it makes close to 400 horsepower, which is also nice.  I think once it is back together I will get some good pictures of it, and show off just how awesome/ahead of their time the 3rd Gen RX7’s are.