Weekly Rotting Car: 1933 Plymouth PC

Sad Looking 1933 Plymouth PC

Sometimes you look back in life and realize that you let some awesome cars slip right through your hands.  This is a story about one of those cars, and I think about it all too often.  It began about 15 years ago when my parents bought a “drivable” 1933 Plymouth PC 4 Door Sedan.  Unknown to my parents at the time of purchase, this was an extremely rare car.

Back in 1933, cars didn’t have fancy model names like “Zephyr” or “El Camino”, they just had model numbers.  Boring, I know.   Even with its brand new fancy-pants one-year-only straight 6 engine, it didn’t have a chance of survival.  The great depression was hurting the country worse than ever, and Plymouth had decided to remake the 1932 bodies (for all intents and purposes) and call it a 1933 PC model.  Much to Plymouth’s surprise, the few customers that they still had were less than impressed with this grand idea.  The Plymouth PC was built for a mere 3 months before they ended production early and switched to the longer wheelbase PCXX and PD models.  That’s right, the customers hated the PC and wanted something different, so Plymouth gave them a longer vehicle.  At least it wasn’t a 1932 model anymore, right? Several years later, WWII began, and cars were being crushed and melted left and right to make war vehicles.  Naturally, the cheapest, crappiest cars out there were the first ones on the chopping block.  (Almost sounds like the Cash For Clunkers program!)  For reasons unknown, my parents Plymouth had survived all these years against all of these unimaginable odds.

Ok, enough of the history lesson,  let’s get back to when the vehicle arrived in the driveway, shall we?  My dad is the best technician I have ever met by leaps and bounds, and he was doing a little nitpicking of the new 4 wheeled acquisition.  A grind here, and hammer there, and pretty soon a frame-off restoration was in full swing.  In his defense, the “drivable” car was built of 80% body filler, 13% rivets, and 7% original sheet metal. The lack of solid body was bad enough that it had to be redone by somebody with more time, the right tools, and more work space.  So off it went to a body guy.  Weeks passed and a fair amount of money exchanged hands.  Frequent phone calls from the body guy assured my parents that everything was going great.  New metal was going on, and it was going to be straight as an arrow when they got it back. Yippy!

A month had passed since we last saw the car, and out of the blue my dad received a phone call from the a storage unit owner looking for rent money.  “What the?”  Well, the body guy had put the Plymouth body and misc parts into a rented storage unit, and took off with the cash.  Nice guy right?  He had never even touched the car, which was truly crushing.

Weeks turned into months, and months turned to years.  The sour taste for this once loved vehicle never left their mouths, which understandably left this ultra rare pile of auto parts sitting dormant in the yard for many years.

At about 18 years old, I just couldn’t take it anymore.  I decided I would take charge of the project and teach myself how to do nice bodywork because I couldn’t stand to see it rot.  Hundreds upon hundreds of hours went into that car.  Cutting rot, welding 300+ rivet holes in the roof, fitting the suicide doors, assembling, building a new firewall, removing the doors again, reassembling….. and on and on it went.  Within a summer, it was finally running again.  It was far from drivable, but it did run.

Going Back Together Again!

Then, the big move happened.  The house was sold and all the rolling stock had to move from the old house to the new.  “Temporarily” the car went to my brothers house.  Temporary then turned into permanently, and before long, the car was parted out and sold piece by piece.  Yes, it was all gone as quick as that, and I am still sickened from it.  Unfortunately, I lacked time to finish it, and space to work on it.  I already had too many cars and had to make choices.  Looking back I would have done things a lot differently, it’s too bad I can’t get it back because I would have loved to finish it.  Hopefully this Plymouth’s parts have helped bring others back to life again. That is what I tell myself at least.

If you happen to know the whereabouts of any of the major parts from this car, I would love to hear from you and see your own Plymouth project!

What kinds of cars you have you let slip away? Leave me comments!

Got a Jeep? We show you how to take it apart!

This week we had a Jeep Grand Cherokee to play with, so naturally, we took it all apart for your entertainment!  We made several how-to videos to show you how to replace the tail lights, the parking lights, the corner lights, and the rear hatch supports.  You can check out all of our videos on our youtube channel.  Don’t forget to subscribe to the channel for the latest and greatest how-to videos!

Replacing a Grille and Headlights on a GM Full Size Truck

Chances are good that you or somebody you know has one of these beautiful trucks.  That’s because they are awesome in nearly every category.  They have reliable small block engines, rugged drivetrain parts, comfy interiors, and dashing good looks.  The Suburban’s hold about 47 people, the 4×4 trucks are great fun when stuck in mud, and the 2 wheel drive trucks looks fantastic when slammed to the ground on 22’s.  Let us not forget the 2 door Tahoes, Yukons and full size Blazers though.  I mean what is better than a bohemouth of a vehicle with only two doors?  You are left wondering “am I in a 4×4 monster truck or an exotic sports car?”  No matter which model Chevy or GMC full size truck you drive, you could benefit from watching this video.  Our own supermodel, better known as “Mike”, proudly displays the best way to swap out the grille and headlights.

Brake Fail: Smashing your Rotors off with an Axe.


Broken Brake Rotors

A simple task that you’ve done a million times before can often take a horrible turn faster than you can say, “where’s my biggest hammer”?   I really thought this brake job was going to be a quick 30 minute pad and rotor slap, like it should be.  Not so much, let’s review.

Step 1: Jack up the vehicle in a safe manner. “Check!”

Step 2: Remove the wheels. “Check!”

Step 3: Remove caliper & caliper bracket bolts. “Check!”

Step 4: Tie up calipers with mechanics wire to prevent them from hanging from the rubber brake hoses. “Check!”

Step 5: Slide the worn out rotors off the hub. “Umm, not sliding. What the heck is going on here?”

Step 6: Clean oily substance off new rotors, and slide new rotors into place. “Whoa….back it up instruction guy! We need to hop in the Delorean and zoom back to step 5. These rotors are stuck, no joke.  What now?”

Step 7: Compress the caliper piston and replace the old brake pads with new brake pads.  Don’t forget to lube the sliders.  “This hammer is not nearly big enough.  Does anybody know where my axe is?”

Step 8: Slide the caliper brackets and caliper over the new rotor and reinstall the caliper bolts. “Ok guys, the rotors are really getting destroyed now. We need torches, cut off wheels, grinders, and a sawzall!”

Step 9: Reinstall the wheels, and torque the lug nuts to your vehicle’s torque specifications. “Hello? instruction guy….I hate you. This is the Worst job EVER!”

Step 10: Before starting vehicle, be sure to recheck brake fluid level and pump the brake pedal to set the pads in place. “……….disappoint………”

625 HP LS7 Powered Pontiac Solstice.

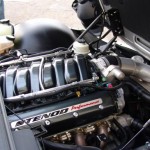
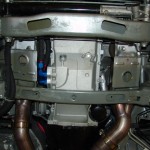
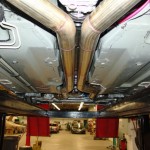
You may not think anything could be more thrilling than the “Pants on the Ground” singing sensation General Larry Platt from American Idol last night, but there is in fact something far greater.  A simple internet link from a friend yesterday took me to some fresh pictures of an absolutely unreal Pontiac Solstice built by Stenod Performance.  One quick peek, and I was desperately clawing at my mouse craving more.  I mean who doesn’t need one of these? It could be the most perfect daily driver for any gearhead out there.  An LS7 with 625 horsepower and a dry sump setup, 6-piston Brembos, and coilover’s for that absolutely perfect stance.  Wrap all that up with a new tiny convertible Pontiac Solstice body, and you have an ultimate win.  It doesn’t even scream “arrest me”, so staying under the radar is even doable.  Stenod definitely built this car just right in my opinion.  I have to guess that when this car is in motion, the driver is laughing hysterically at how absolutely absurd it is. Well done.

I will shut up now, enjoy the eye candy, I know I did.

How to Install a Chevy Cavalier & Pontiac Sunfire Control Arm

Today we have a Pontiac Sunfire that may or may not have seen more air time than we want to admit.  Much to our surprise, it continues to impress us with its never ending survival strategies.  Sure we have to throw a few parts at it from time to time, but that’s what happens when you pretend your Sunfire is Ferrari-built Baja vehicle.  It may not look the part, but I can assure you that deep within this vehicle is the heart of a hostile jellyfish and the soul of 1000 wild turkeys.

On this specific Sunfire (which is the really the same as a Chevy Cavalier), the rear control arm bushings were completely gone, in the physical sense.  This made driving extremely scary, especially while steering and braking because the car would dart in the direction that you least expect.  Just when you think you have the Sunfire figured out, it throws a curve ball at you and leaves you trembling in your tastefully upholstered cloth driver’s seat.  In this video, we take the unintended roller coaster ride out of this very saucy Sunfire.

How to Install a new Headlight on your Voyager / Caravan

The other day, while installing some auto parts, it dawned on us that we could be sharing the thrill and excitement of installing car parts with the entire world!  Naturally, we considered using supermodels for these how-to videos, but after careful consideration, we decided that you would rather see us instead.  Your Welcome!   We may not be in bikinis (thank goodness), and we may drop a headlight from time to time (2.55 minutes in), but this is real life and things happen .  Take a look and let us know what you think.

This specific video is how to install a new headlight on a Chrysler Voyager, which in reality is the same as the Dodge Caravan and Chrysler Town and Country.