If you hear a wind noise in your car, it’s time to check the weatherstripping. A bad car door seal can not only cause a wind noise but it can also lead to moisture collecting inside, and this can damage interior parts. Find out how to check the weatherstripping and what can happen if you have a bad car door seal in this article and video.
How to Check the Car Door Seals for a Wind Noise in the Car
What Is the Weatherstripping?
Weatherstripping, also known as seals, protect your vehicle from outside elements like rain. They’re usually placed along the doors, windows, the trunk, hood, and body to close gaps. They can be held down by adhesive, screws, glue, clips, and pressure.
There are many kinds of weatherstripping. Read more about automotive weatherstripping
Signs of Bad Weatherstripping
Wind Noise in Your Car
If the weatherstripping is damaged, air can drift inside your car as you drive and make a whirring wind noise.
Water and Outside Elements Leaking Inside the Car
If you find rain water or other elements keep getting inside your interior, it’s time to replace the weatherstripping as soon as possible.
Torn, Split, or Loose Weatherstripping
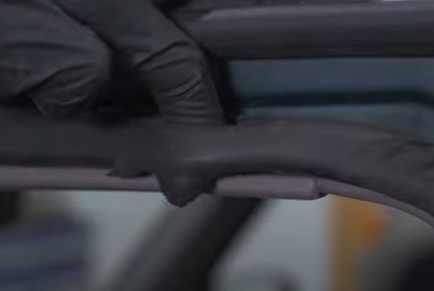
The weatherstripping can loosen from the adhesive over time. It can also split and tear. It’s common to find the seal brittling or tearing, but if there are holes or tears large enough to let wind and water in, it’s time to replace the seal.
What Could Happen If I Don’t Replace a Bad Door Seal?
Moisture Can Damage Parts and Make Smells
Apart from hearing a wind noise in your car, moisture can also collect inside the cabin if the weatherstripping is damaged. You may find it in areas like the windshield or the power window switch. If moisture manages to collect on electricals, it can create corrosion, and this can damage parts and cause more problems like your power windows not working. If moisture is allowed to get inside the floorboards or headliner, you may smell a musty, unpleasant odor.
How to Replace the Weatherstripping Yourself
Find a how-to video related to your year, make and model in our video library. Follow the step-by-step instructions from our expert mechanics and start doing your own repairs.
General steps to replace weatherstripping
- Remove Any Screws from the Weatherstripping
Check the weatherstripping for any screws and remove them before prying the weather stripping off
- Pry the Weatherstripping Off
Pull off the weatherstripping by hand
- Remove Adhesive Residue
Removing any adhesive from the contact surface
- Clean the New Weatherstripping
Clean the contact surface and new weatherstripping by wiping it down
- Apply Adhesive to the Contact Surface
Apply the weatherstripping adhesive to the contact surface before putting the seal on
- Install the Weatherstripping and Apply Pressure
Insert the weatherstripping to the contact surface and apply pressure to connect with the adhesive
- Replace Any Screws to the Weatherstripping
Reattach any screws or fasteners to the seal before letting it dry
- Let the Adhesive Dry
After attaching any fasteners, let the adhesive dry to the new seal
Shop Quality Auto Parts

More Tips
- How to Replace the Weatherstripping on Your Car
- Water Leaks in Your Car When It Rains? How to Find and Fix Water Leaks
- DIY Headliner Repair: How to Fix a Sagging Car Roof Lining
- Dodge Caliber Problems: 1st Generation (2007 to 2012)
- Loose Gear Shifter? Maybe It’s Time for a Shifter Cable Replacement
