Learn what you should and should not do if you need a diesel fuel filter replacement with these tips from our expert mechanic Sue. You’ll find out how to replace a diesel fuel filter and what steps you should avoid.
Tips for a Diesel Fuel Filter Replacement

If you don’t know how to change your diesel fuel filters, these tips review how to replace them.
Steps for handling a diesel fuel filter replacement
- Properly raise and support the vehicle
Raise and secure the vehicle with a jack and jack stands.
More on how to raise and support your car - Locate the Fuel Filters
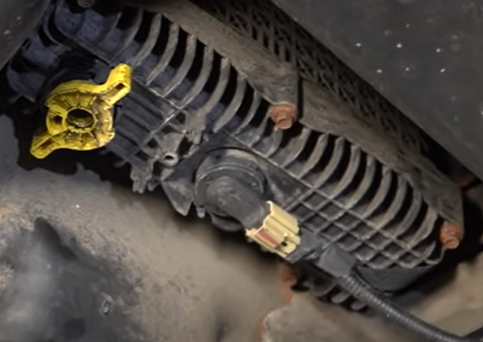
In our example the cartridge with the paper filter is next to the fuel tank. There is an electrical wire and 5 bolts holding the cartridge in.
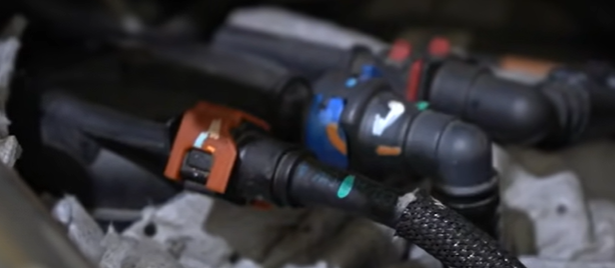
The filter is located in the engine compartment on the driver side. There are three hoses and an orange, blue, and red connector. 1A Auto mechanic Sue placed an absorbent pad underneath the connectors to prevent diesel fuel from soaking the engine. - Disconnect the Connectors from the Fuel Filter
You don’t need a tool other than gloves to disconnect the connectors from the fuel filter. The clips are delicate and if broken will not lock in, leaving you with another problem and a car that doesn’t run right. Have the engine off, and there should be no pressure. Press the tab and push the connector out. Then wiggle the lines and loosen and remove them.
- Turn the Fuel Filter Clockwise and Remove It
With the lines disconnected, Sue turns the fuel filter clockwise and removes it. Handle the filter carefully since diesel fuel can leak.
- To Reinstall, Reverse Steps 2-4
Reverse steps 2-4 above to install the new fuel filter. When reconnecting the lines, the lines are different sizes and will only connect to its matching connector.
- To Remove the Fuel Filter with the Paper Filter, Drain the Water
We have a drain pan ready and turn the drain plug to open it. You’ll want to make sure you drain it fully before removing the cartridge. Let the water will drain. These filters should be changed every 2 to three oil changes or every 25,000 to 30,000 miles.
- Remove the Cartridge
With all of the water drained, disconnect the electrical connector to prevent damaging the wires.
- Remove the Fuel Filter
Place the cartridge in a drain pan. Lift the filter by tugging it up to disconnect it from the clips.
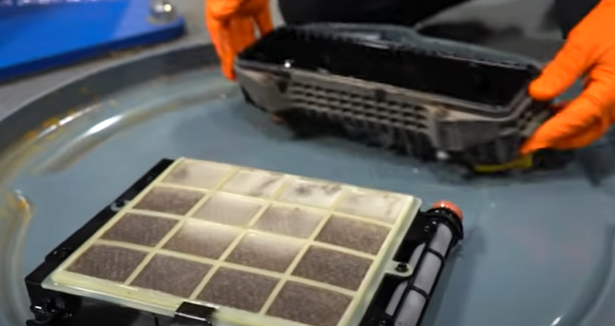
- Pour Debris Out of the Cartridge
Pour any debris out of the cartridge, like oil, water, and dirt.
- Change the Filter Housing Gasket
Before installing the new fuel filter, we recommend changing the filter housing’s gasket. Pull out the worn gasket with a small screwdriver.
- Clean the Housing with Clean Diesel Fuel or a Dry Cloth Rag
With the gasket removed, clean the housing with a brush and wipe it dry cloth rag. If you don’t have clean diesel fuel, wipe it clean with a dry cloth rag. We don’t recommend cleaning the housing with brake cleaner or water since that will contact the diesel fuel.
- Install the Fuel Filter to the Housing
Press the new clean fuel filter into the housing.
- Install the Housing
Tighten the housing with a ratchet and extension to prevent damage.
- Tighten the Water Drain
Make sure the water drain is snug tight and locked. For example, if the water drain is open 1/8th of a turn, you’ll have a mess during the next step when you turn the key on to bleed the system.
- Bleed the Fuel System
Air needs to be bled from the system or it can damage parts like the fuel pump and fuel injectors. Don’t start the truck right away so that the pump isn’t damaged.
Bleeding the Fuel System with a Push-Start Button
If you have a push-start button, click it twice without your foot on the brake pedal. With the ignition on, you’ll hear the bubbles in the filter. You’ll also hear air in the pump. Do this 3 to 5 times until the sound of bubbles gurgling ends.
Bleeding the Fuel System with a Key
Watch this article’s video around 7:10 for an example of bleeding the fuel system with a key.
If you have a key, the process is similar to vehicles with a push-start button. Turn the key to the ON position and let the pump circulate and the vehicle run for around 5 minutes. You’ll hear the air in the pump. Then shut the vehicle off and do this for around 3 to 6 times, a minimum of 3 until the bubbles stop gurgling. - Check the Filters for Leaks
With the system bled, check the fuel filters for leaks. Tug the lines and make sure they’re connected securely.
- Bleed the System for a Final Time
Bleed the fuel system for a final time. Turn the vehicle on and let the rest of the air bleed. Then once the pump shuts off, repeat this step for a few times.
Quality Auto Parts – Direct Fit – Free Shipping

