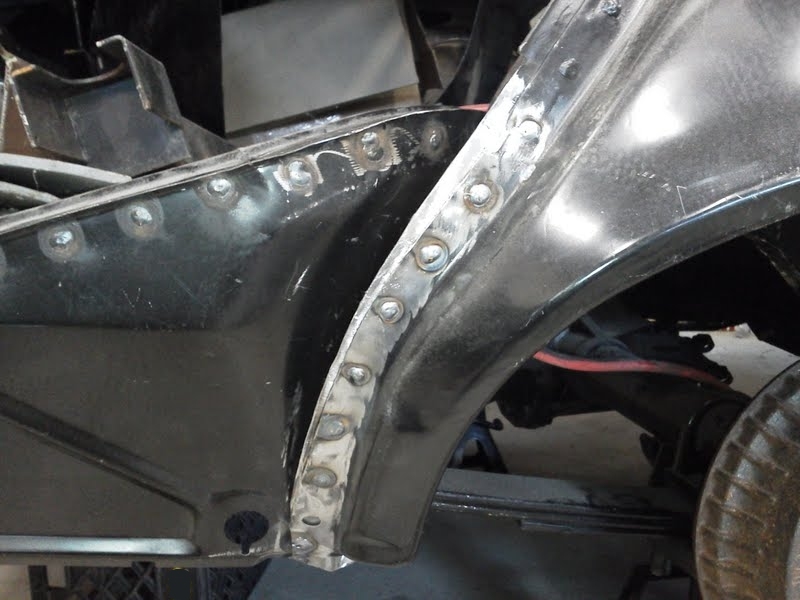
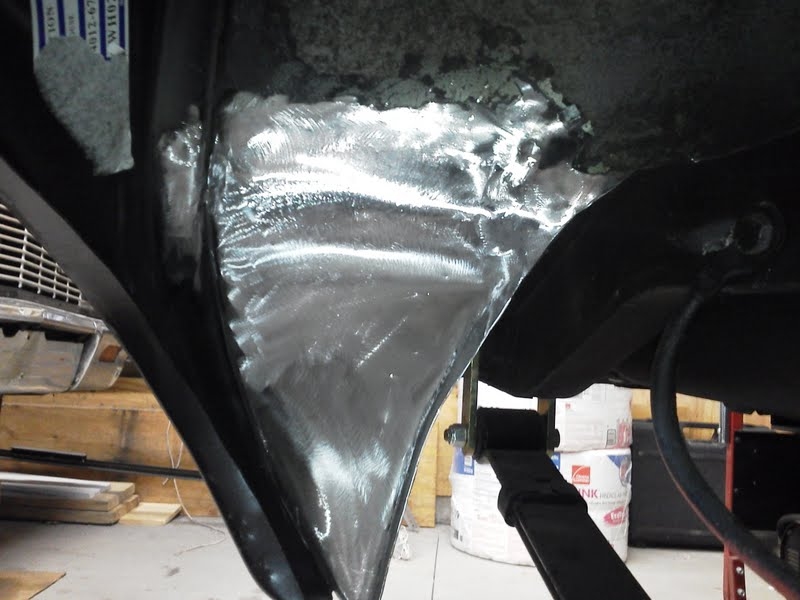
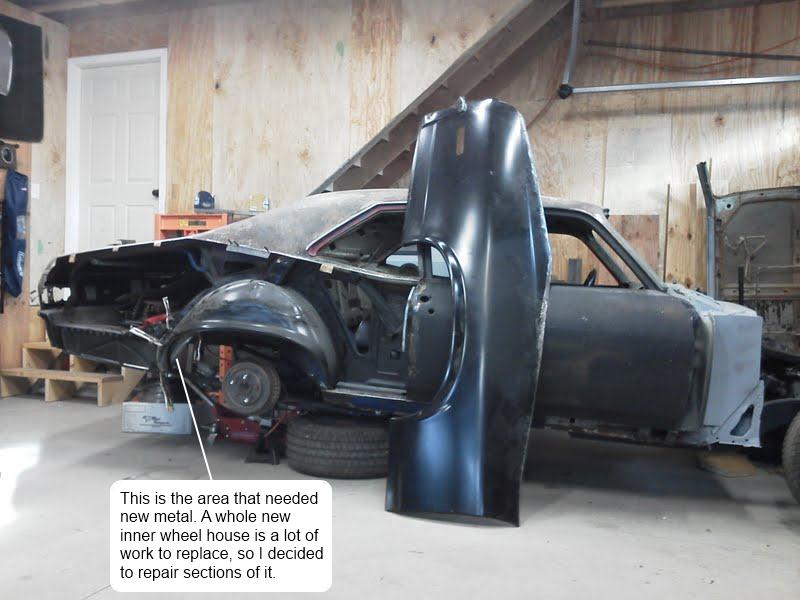
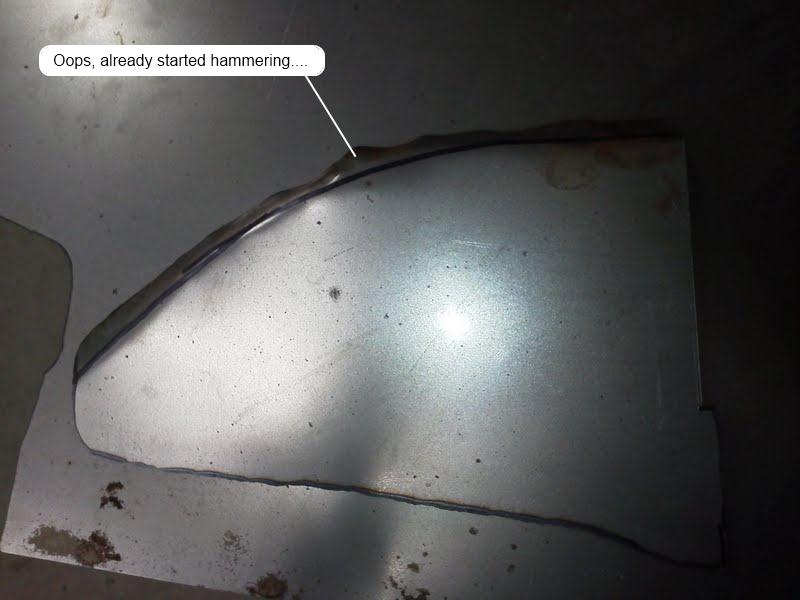
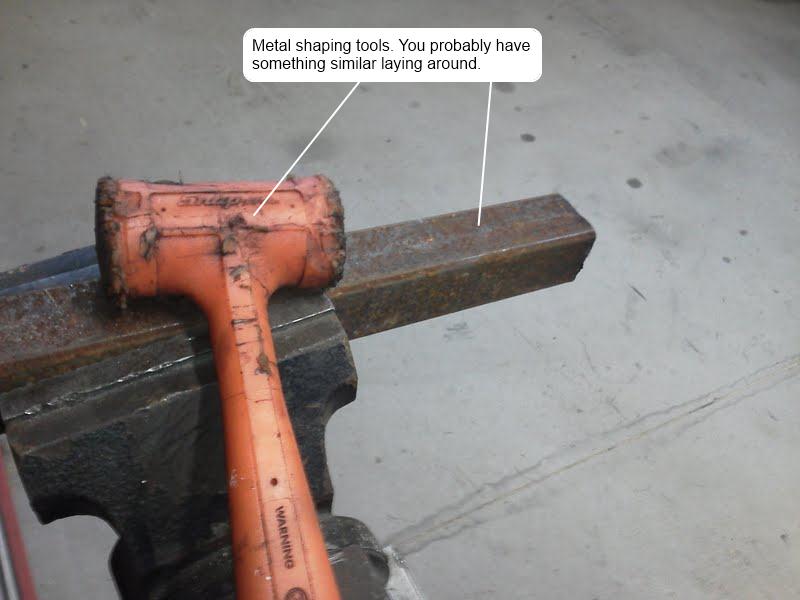
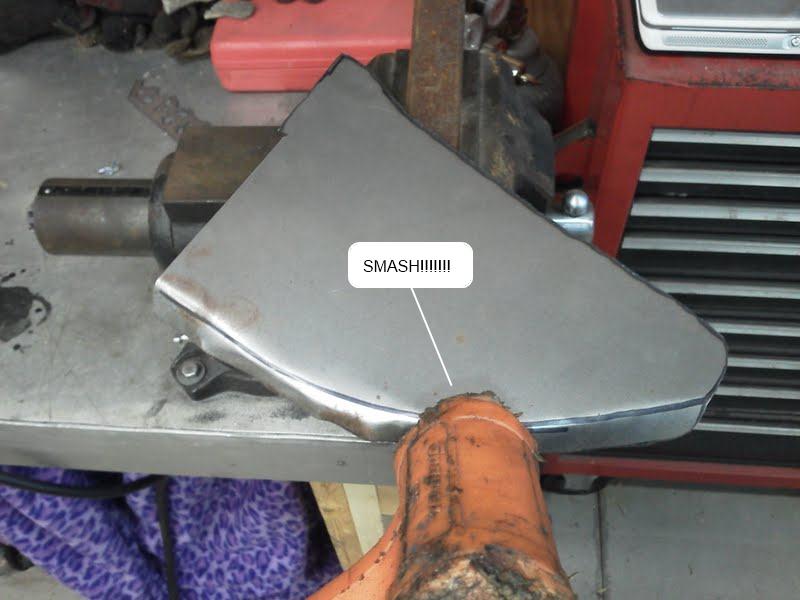
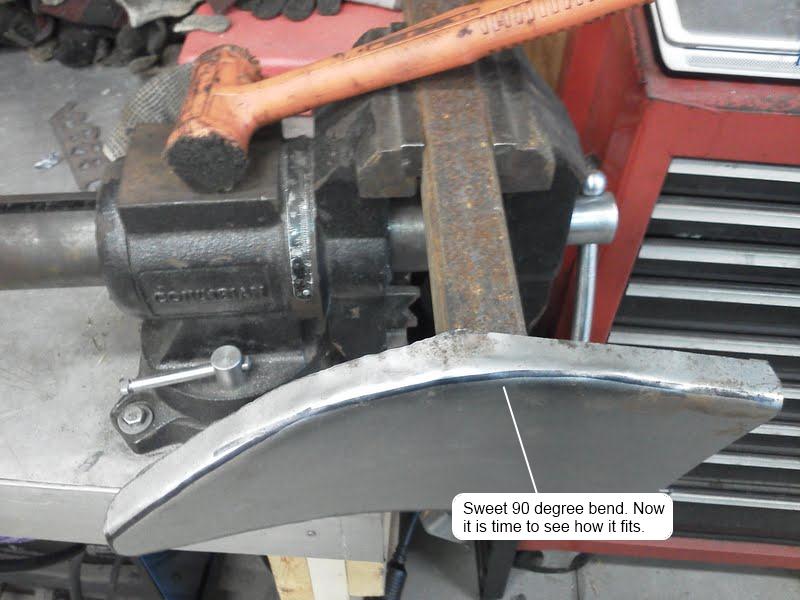
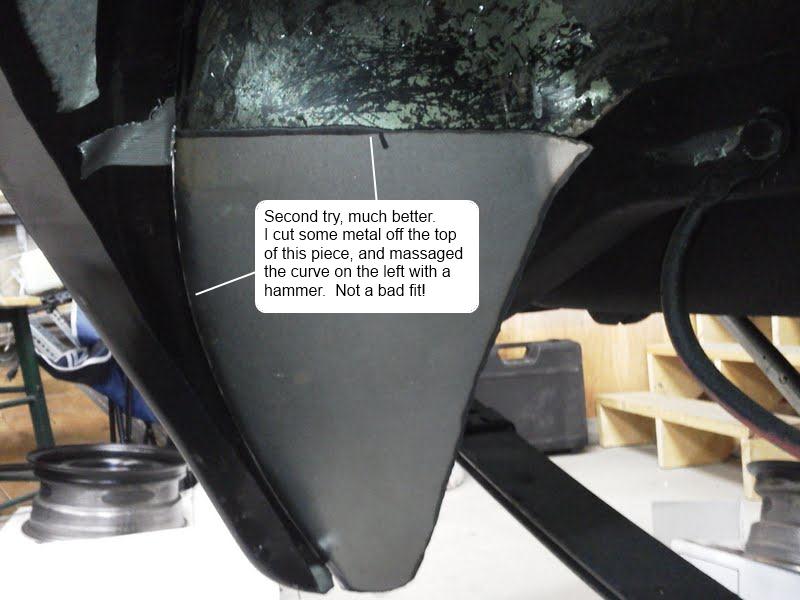
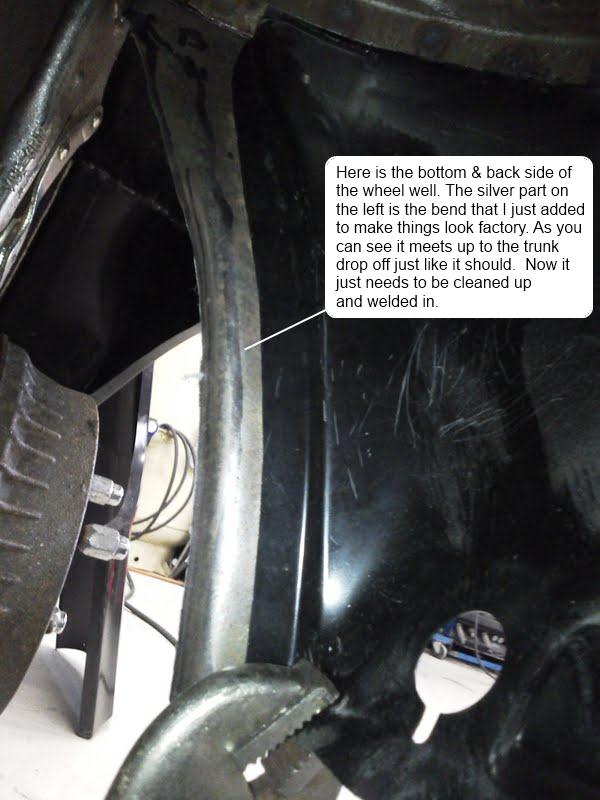
Today it was above freezing in the garage, so I decided that it would be a great time to finally finish the 1972 Nova inner wheel house that I had started several weeks ago. We left off in the last post with the repair panel about 95% made. So today I just had to clean the surrounding areas up and prepare the new panel to be welded in. Easy enough right? I started by hitting all of the surrounding metal with the abrasive Roloc discs attached to the angle grinder. This removed all of the old paints, primers, and seam sealer from the “hot zone”. I like to also chip off any nearby undercoating too because that stuff burns fast, and stinks like you wouldn’t even believe. It’s probably not so great to inhale either. Once clean, I tack’ed the new panel in place with a few spot welds, double checked everything, and then spot & stitch welded it into its new home. Then I ground the visible welds down, and snapped off a few pictures.
Next, I’m going to clean this whole area really well, and give it a good soaking in black POR-15. Sadly, I will have to wait for a warmer day because I don’t have heat in my garage, and POR-15 doesn’t flow or dry really well when it’s sub-40 degrees F. Boooo Winter! Let’s all cross our fingers and hope that we get a warm day this week. If we do, I may be able to tackle the quarter panel next weekend!
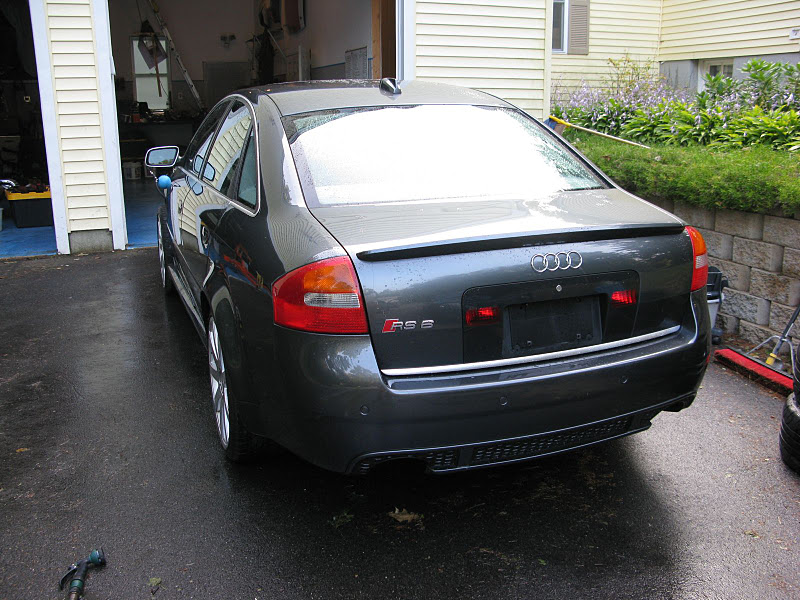
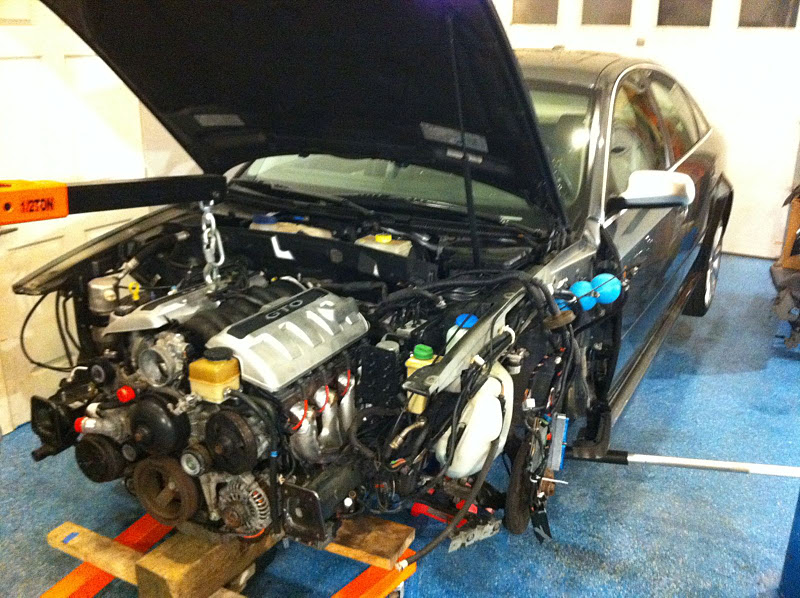
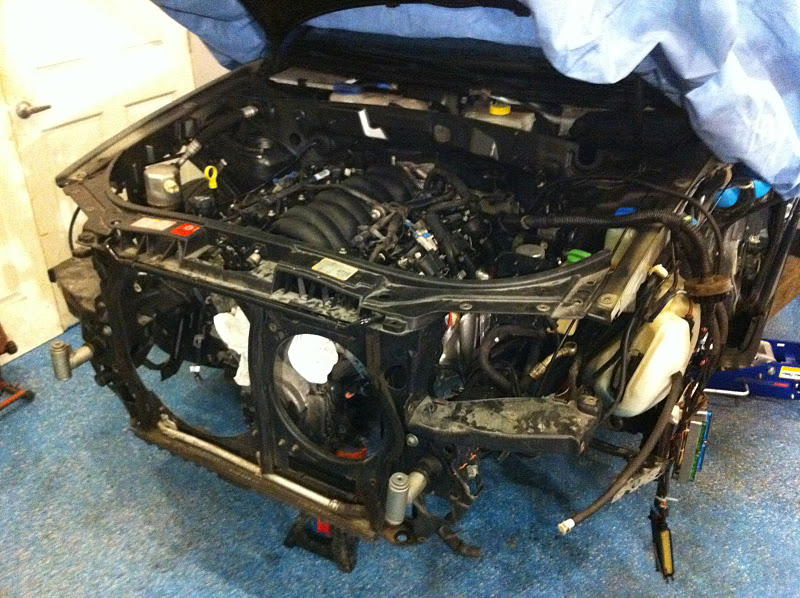
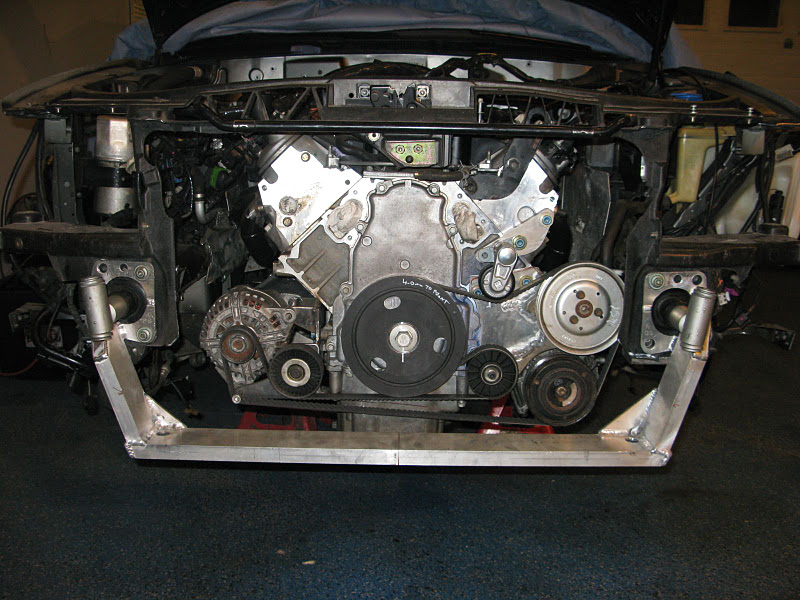
Great, now that I have your attention, what you are about to witness is pure automotive hottness at its very best. There’s beautiful fabrication, a beautiful car, a beautiful engine, and an overall beautiful build thread. The whole event took place over on MotorGeek, and if you have a spare hour or so, you will definitely want to read through the entire build thread. It’s dang near incredible. Here is the short story.
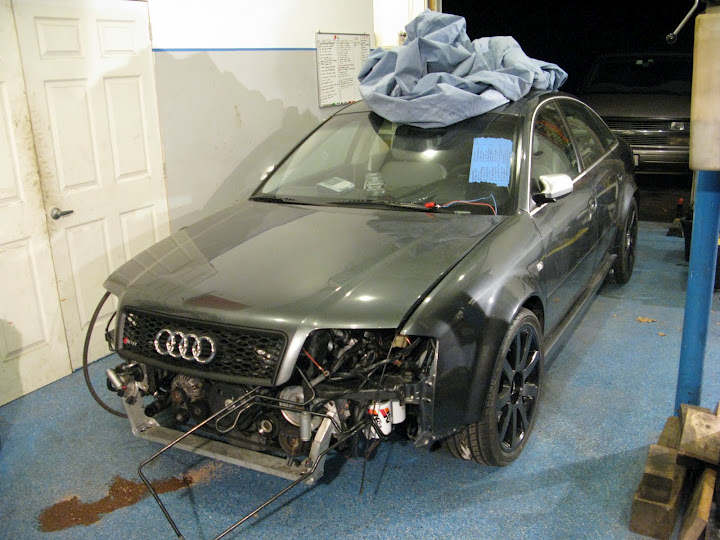
A user known as “timmmy” got a great deal on a 2003 Audi RS6 that had a missing twin turbo engine. He decided that rather than replacing it with a very expensive factory replacement, a 2004 Pontiac GTO LS1 v8 would be the best candidate to go in its place. The best part? He also swapped in manual transmission and kept the all-wheel drive. For-The-Win. Absolutely ideal daily driver in New England? Yessiree Bob… err… should I say “Judas”? I forgot to mention that, this project is named Project “Judas.”
Challenges of the Audi RS6 LS1 Engine Swap
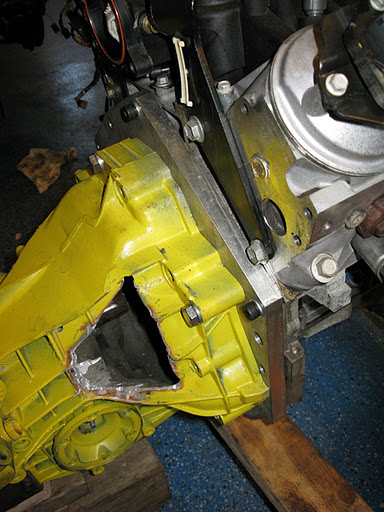
Now it’s one thing to plop this GTO engine into a 70 Chevelle, but a totally different game to surgically slide it under the hood of an all-wheel drive (AWD) Audi RS6. Mechanically, this engine swap had a unique set of challenges that you might expect, like relocating the transmission further rearward, modifying axles, and just basically making space for 4 more inches of engine under the hood. There was plenty of awesomely fabricated parts to make this happen. Transmission cross-members, engine mounts, accessory brackets, the whole shebang. The majority of the parts were made of aluminum, and if you have been reading the 1A Blog for a while, you know that I’m a sucker for TIG welded aluminum.
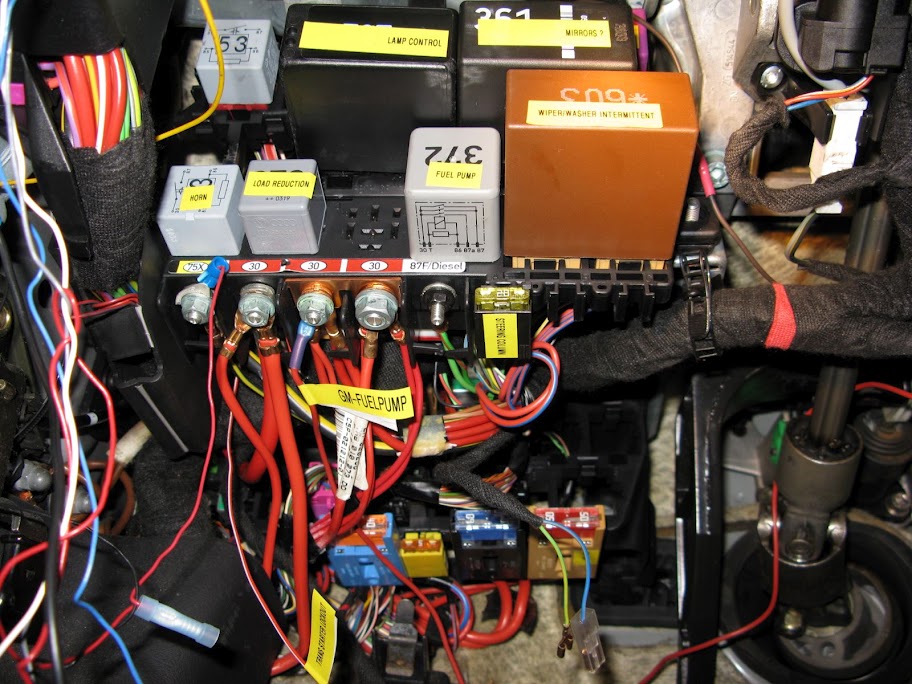
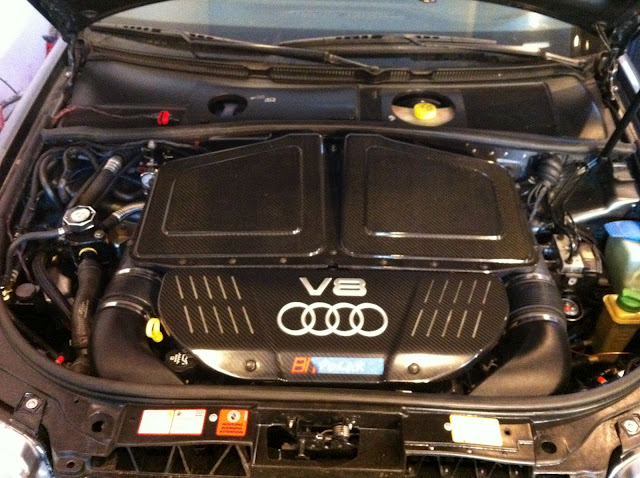
Fuel Injection. For those of you that have done fuel injected engine swaps before, you know that it has its own variety of challenges that carbureted engines don’t have, like ohhh, about 4 million wires. Not only that, but this builder then had to connect the LS1 engine harness to the Audi harness and have them play merrily. That way he would have a dashboard, OBDII port, and engine accessories that actually worked like they were intended. That takes some serious noggin power, and is almost always the most frightening part of a car build.
Within the build thread, there are probably hundreds of pictures, many videos, and great automotive banter throughout. I grabbed a few to share with you today, but really you need to check out the complete thread. It’s everything you want and more.
You know I grabbed my favorite video as well right? Here, he tests the Audi RS6’s new launching capabilities and LS1 rev limiter. They work!
Special Note To MotorGeek Guys: I fixed the “slight” error on transmission swap 😉 My bad.
Learn to Do DIY Repairs on Your Car
1A Auto has thousands of how-to videos with steps from professionals with the goal to empower you to do your own car repairs. Learn how to diagnose and replace parts on lots of makes and models.
Over the past weekend, I decided to fix a part of the 1972 Nova that has been waiting for quite some time. It’s the passenger side rear… inner wheel house (a mouth full). You see, it rotted away decades ago, but I couldn’t repair it because I wasn’t even sure what shape it was supposed to be! I first had to rebuild everything around it to see where it fit in. So once I got the new outer wheel house, trunk floor, and trunk drop off attached, this project could finally be tackled. Since people love build threads, I decided to document the fun with plenty of photos. Let me know if you like this sort of thing, and I will be sure to post tons more. As you can see, there is plenty of work ahead. If you like the video, I can do more of that. If you prefer strictly pictures, I can cater to that. Tell me what you want to see and I will do my best to please the masses. Here we go!
Around 1.5 years ago, I made a blog post about a 1972 Chevy Nova project. At the time I said;
Making this post allows me to be accountable for work getting done or not getting done on his car. If you fail to see updates on a regular basis, please kick me, and we will pick up the pace. Ideally we want it to move under its own power in 2010.
Yea, about that. We did work on it some more after that, but then some life happened again, and progress was delayed. My bad. I take the full blame. Guess what though… It just arrived at my house, so I can no longer escape it. I don’t even think I am allowed to return it to the owner unless it looks like a completely sinister tire shredding hell ride. Anything less will be unacceptable. So, let’s try this again, and shoot for 2012. Oh, and if 2012 turns into a zombie apocalypse, we will turn it into a tank or something.
Lots of work ahead of me this winter. Fingers crossed for a warm winter in New England. Yeaaa…
Seriously. If you guys don’t see updates on this every couple weeks at the least, please don’t hesitate to kick me.
Great News! I have a short and sweet update on my 1964 Impala convertible project. Here goes…
I left off with some some freshly welded quarter panel action on Part 5 of the Impala project. From there, I went around the entire quarter panel and spot welded it just like they would have in 1964, except that I did it with a MIG welder (Hey, nobody is perfect amirite?). Once it was fully welded on, I decided that it was time for a drastic change in scenery. Yes. It was officially time to soda blast the entire car down to the bare metal, and give it a brand new, even, epoxy coat of primer. There were a million benefits to doing this, like having no more rust to deal with, a solid base for “real” body work, and it would be sealed properly from the elements around it. Yes, there would still be some metalwork here and there to do, but at least I would be working with clean metal from now on.
So last weekend was huge. I borrowed a soda blaster from my friend that owns Homestead Blast, and spent the day blasting my way through decades of mismatched primers and disgusting grossness. I used a few hundred pounds of soda, and a then several hundred pounds of sand. When all was said and done, my car was beautifully naked metal.
I then washed the whole car down with some metal-prep cleaner, and began mixing up some black epoxy primer. I did exactly as the directions told me, with a 2:1 ratio of paint to hardener, mixed it, filtered it, and turned the pressure down on the compressor. After a few questionable passes with the spray gun, I got it dialed in, and the primer began laying down smooth. It seemed to take forever to get the trunk, hood, Arizona born rust-free doors, and the body itself covered in two coats of the stuff, but at about 10pm, I had finally finished.
It is finally beginning to look like a legit vehicle again. Phew! I still need to clean up & prime both front fenders, and come up with a new passenger side hood hinge (mine is beat). I’m also going to splash some POR-15 on the insides of the doors, fenders, rockers, etc. The last time I used that stuff, it changed my world, and I need more of it in my life.
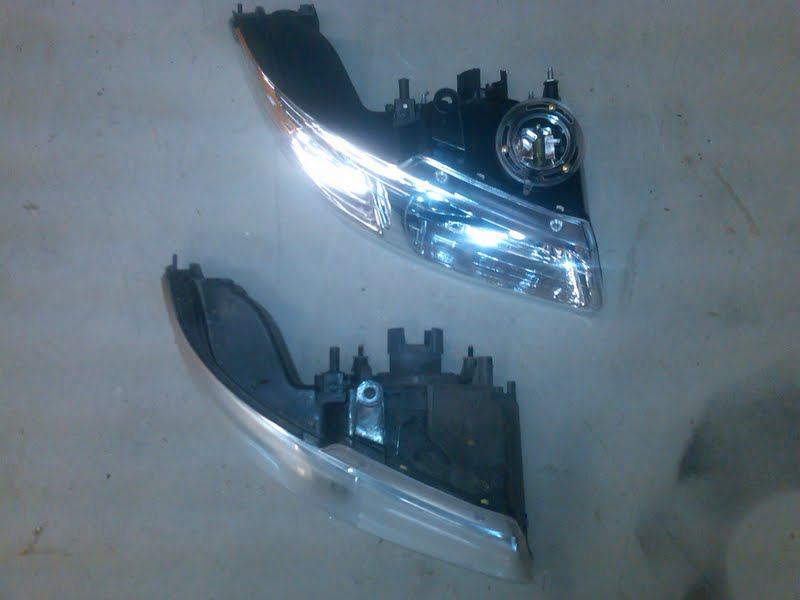
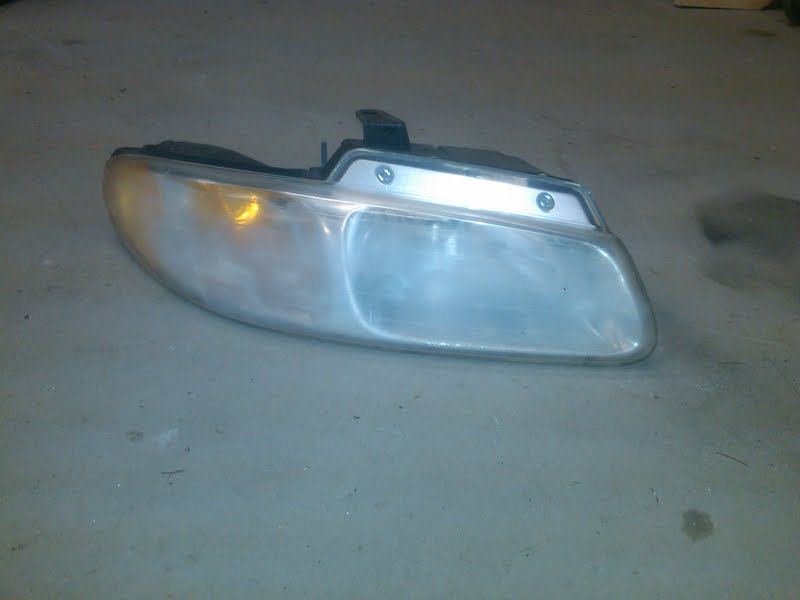
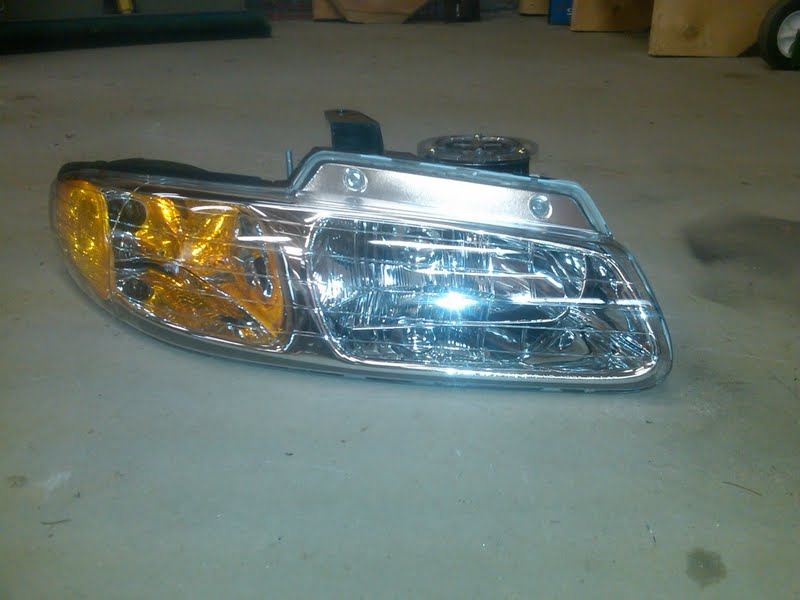
Working at 1A Auto, I often find myself discussing the differences between OEM vs. Aftermarket auto parts. Today we have a little bit of that, along with an old vs. new part comparison. It comes to you in the form of 1999 Dodge Grand Caravan “non-quad” headlights.
A neighbor and friend of mine came to me recently after her van failed inspection for having headlights that light cannot possibly pass through. The inspector planted a big “R” sticker on the windshield and sent her on her way. Last year, her husband had tried using the headlight polishing magic in a bottle, which did worked temporarily, but as you can see, it was not a long term solution. This year, the only good option was to toss the sand blasted, yellowed, 12 year old OEM headlights into the trash, and bolt on a fresh new set.
As you can see, the new lights are identical shapes and sizes as the originals, but they also included the leveling bubbles to help you aim the headlights once they are installed. Fancy right? Other than that, it was a simple switcharoo. Pull the old ones out, put the new ones in, and finally see the light. The End.
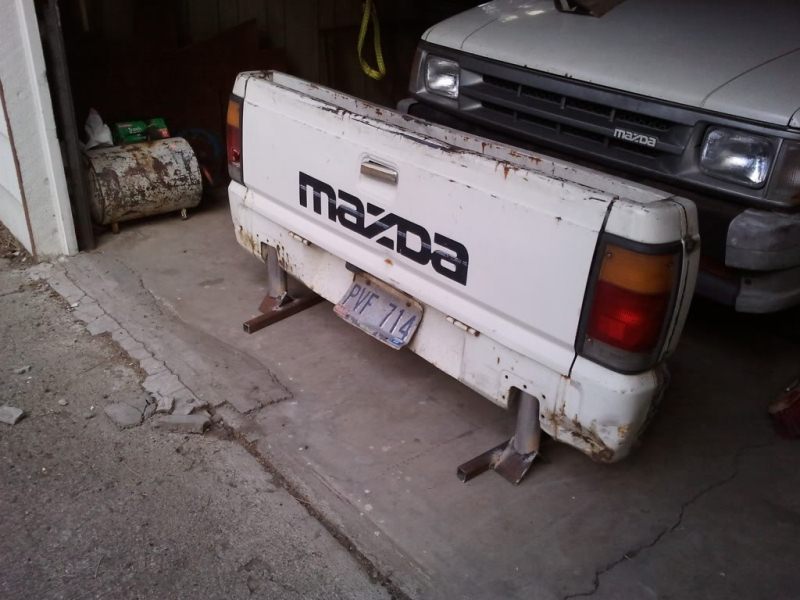
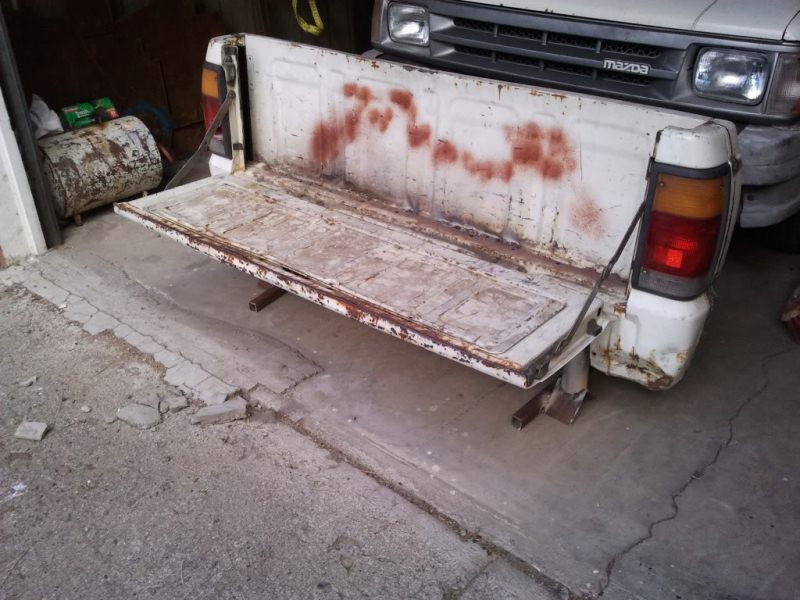
If you have ever hung out in a garage before, you know that seating is usually limited to old wheels, plastic crates, and cold concrete. While this concept may seem crazy to some, the reasoning for this is quite valid. Floor space in garages is extremely valuable, and it should not be wasted with non-tools, parts, or vehicles.
GREAT NEWS THOUGH! There is a solution that is logical, comfortable, and down right decorative! I found this amazing idea posted by “Outcast99” on Killbillet.com and was instantly filled with jealousy. You basically grab an old truck bed from your back yard, a nearby field, a scrap yard, or the woods, and start cutting. Once the bed is commandeered, you begin the project by cutting the sides and floor out of the bed. You then weld the front to the back with only a couple inches of space between the front of the bed and the tailgate. Next up, you add a metal base made from the scrap steel you have under your workbench. Before long, you have sweet folding seating for up to 2 adults or possibly 3 lovely ladies! When you need the extra space, you simply kick your friends out and fold the tailgate up. How cool is that? Jealous yet?